> ## Documentation Index
> Fetch the complete documentation index at: https://docs.release0.com/llms.txt
> Use this file to discover all available pages before exploring further.
# How to integrate your Agent with NocoDB
> Integrate NocoDB with Release0 to create dynamic, data-driven chatbot interactions using structured data management. Learn how to fetch, create, update, and delete records in your agent dialogs.
## Overview
**NocoDB** is an open-source backend that enables structured data management without writing code. When integrated with a **Release0 agent**, it allows for dynamic, data-driven interactions that enhance the functionality and personalization of your automated experiences.
## Advantages of Using NocoDB with Release0 Agent
Connecting NoCodeDB to your Release0 agent allows you to:
* Fetch and display content based on *User Inputs*.
* Create responsive flows with database-driven logic.
* Adapt dialogs in real-time based on database values.
* **Create** new records (e.g., form submissions).
* **Read** data for personalization or decision-making.
* **Update** fields based on conversation outcomes.
* **Delete** entries if needed.
> **Example**: Display product options based on the user’s selected category using `{{user.selected_category}}`.
This guide explains how to use the **NocoDB** element to interact with your NocoDB tables in an Agent Dialog. You can create, update, or retrieve data from your NocoDB tables. This includes identifying the **Table ID** and configuring the **Search Records** action effectively.
## How to Find Your Table ID
To locate your **Table ID** in NocoDB:
1. Navigate to your **NocoDB dashboard**.
2. Locate your desired table in the left-hand sidebar.
3. Click on the **three dots** icon (`...`) next to the table name.
4. Find the **Table ID** in the pop-up menu (as shown in the image). Copy it for use.
## Using the Search Records Action
The **Search Records** action in NocoDB allows you to retrieve specific records from your tables. This action requires:
* **Table ID** (mandatory)
* **View ID** (optional, for filtering specific views)
* Additional configuration such as filters and response mapping.
### Steps to Configure
1. In your Agent Dialog editor, select the **NocoDB element**.
2. Choose the **Search Records** action.
3. Input the following fields:
* **Table ID**: Paste the copied Table ID.
* **View ID**: If you want to filter data by a specific view, add its ID here.
* **Filter**: Set conditions to retrieve `All`, `First`, `Last`, or `Random` records.
* **Response Mapping**: Map retrieved data fields to variables for use in your agent.
### Example Setup
#### Input
```json theme={null}
{
"Table ID": "pl0jailghvv7x",
"View ID": "awyy0nk17stiqr",
"Filter": "First",
"Response Mapping": {
"Name": "VariableName",
"Email": "VariableEmail"
}
}
```
#### Workflow Example
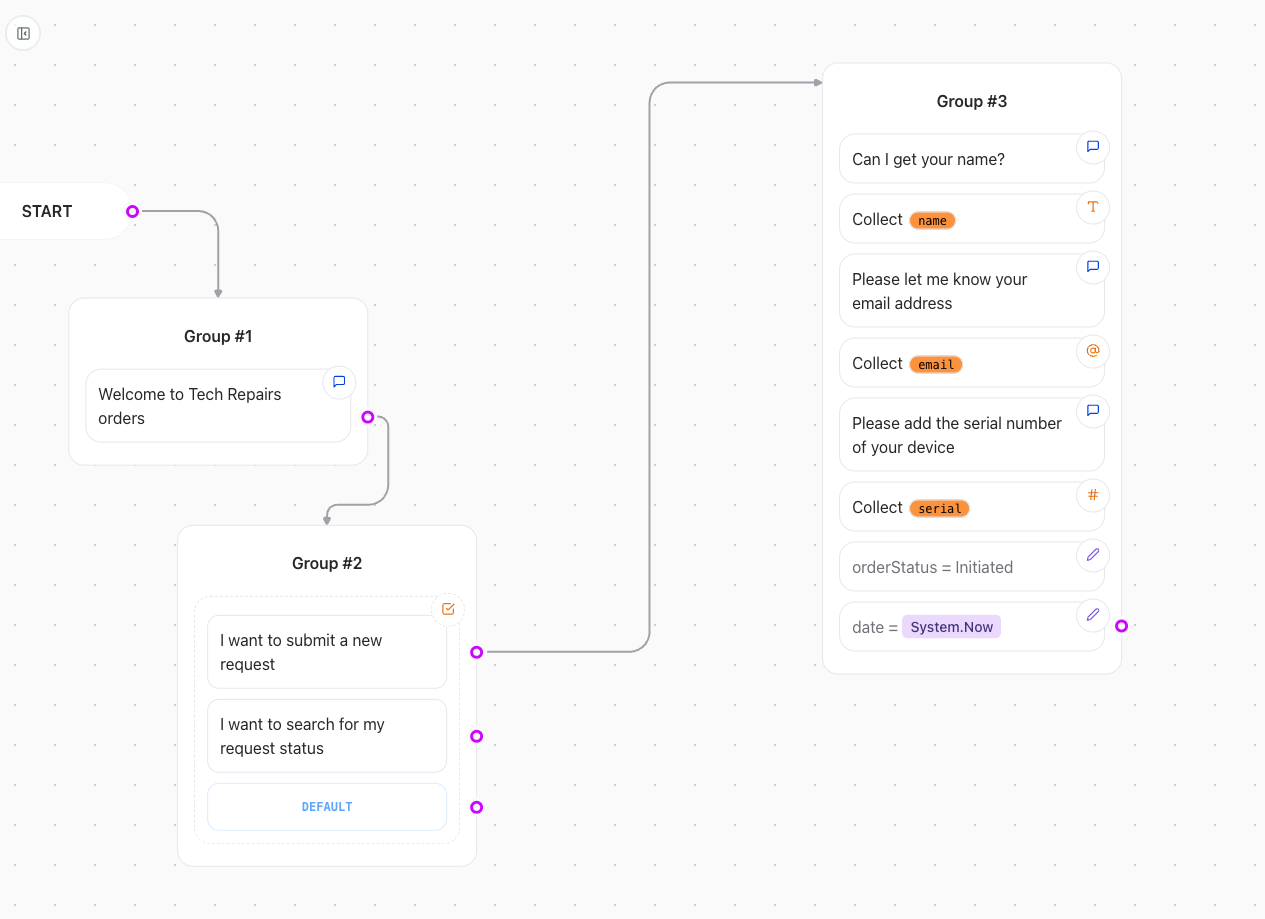
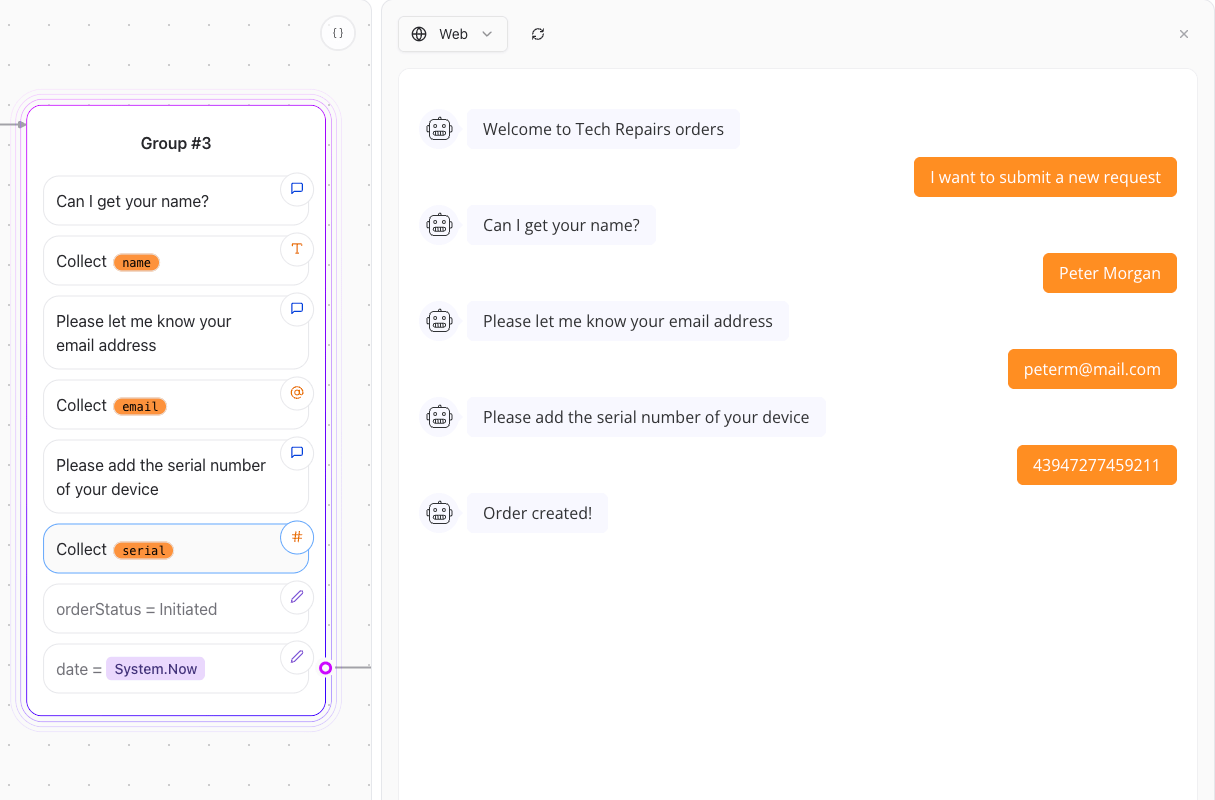
In this simple example we are going to create a work order record for a repair company. To keep the example simple we will only ask for the user name, email, and serial number of the device.
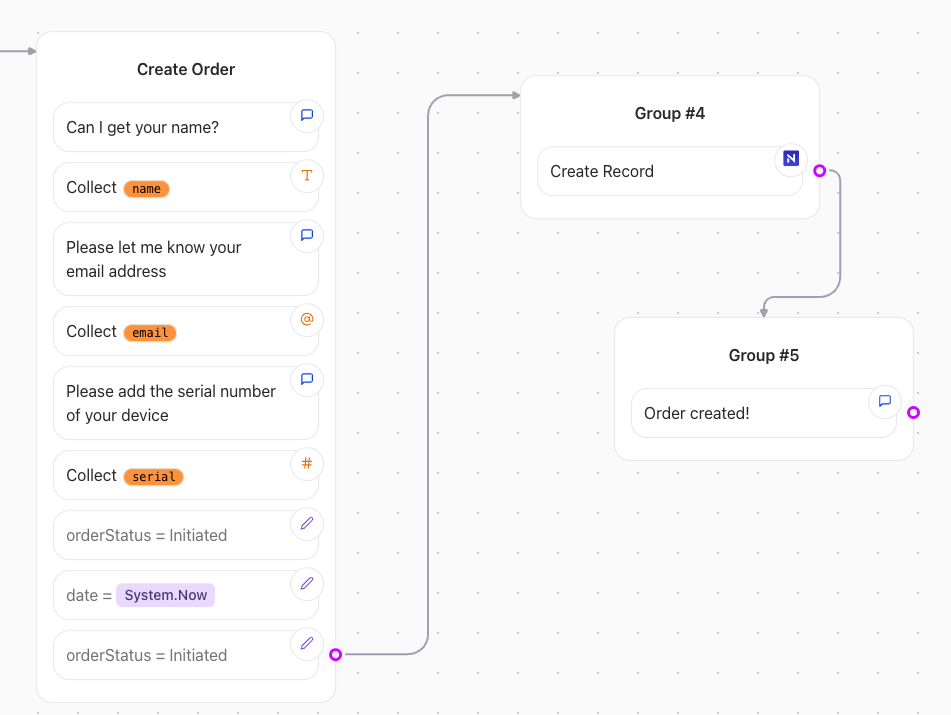
The first step is to create a **Text element** to greet the user and ask for their name, email, and serial number.
We are also creating a **Date** field and a **Order Status** by using variables.
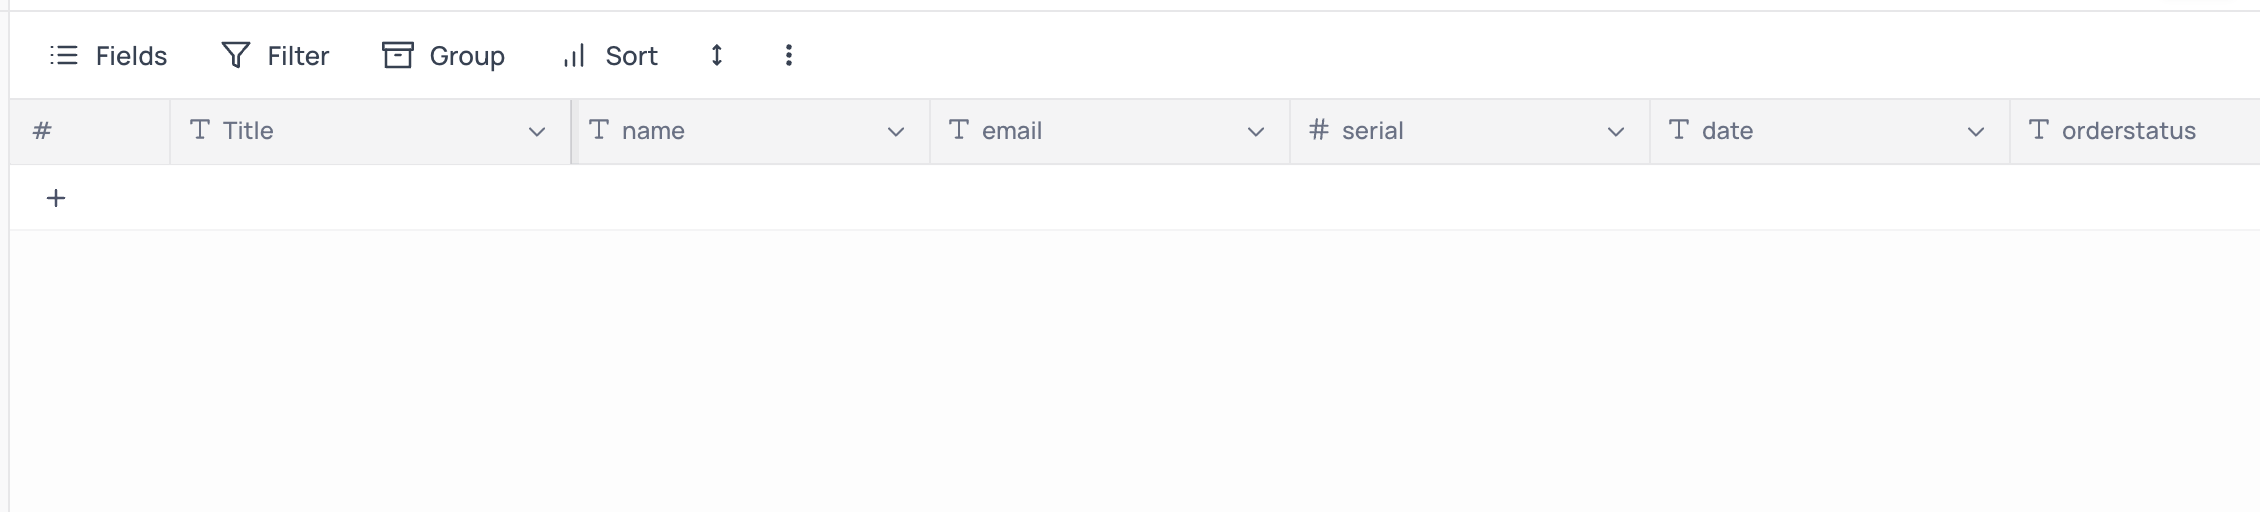
Next we can head to NocoDB site to create a new table. We will create a table called **Orders** with the following fields:
* **Name**: Text
* **Email**: Text
* **Serial**: Text
* **Date**: Text
* **OrderStatus**: Text
Next we can connect the NocoDB element to the **Create Record** action. We will use the **Table ID** from the table configuration and the **Response Mapping** to map the variables we created in the previous step.
Now we can map the variables we created in the previous step to the NocoDB fields. We will map the **Name** variable to the **Name** field, the **Email** variable to the **Email** field, and so on.
Then we complete the records creation with a confirmation message.
We can test this scenario by running the agent and entering the data.
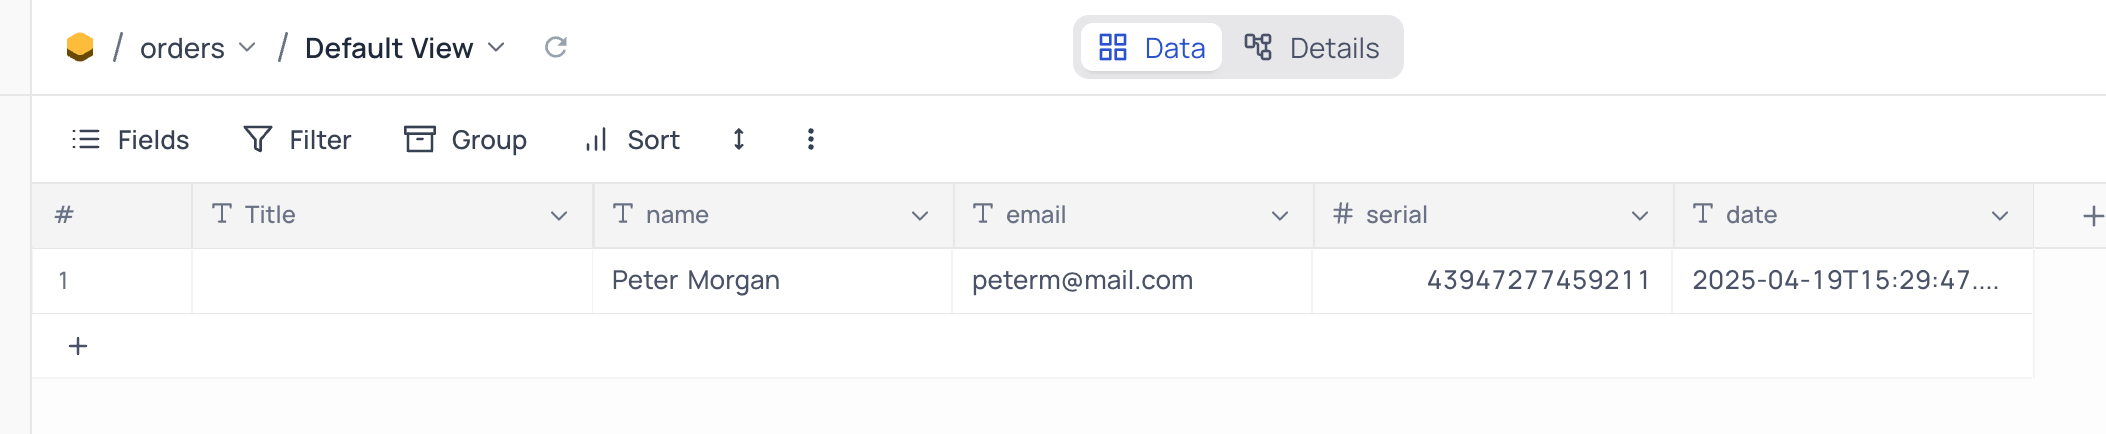
Once we have entered the data we can check the NocoDB table to see if the record was created.
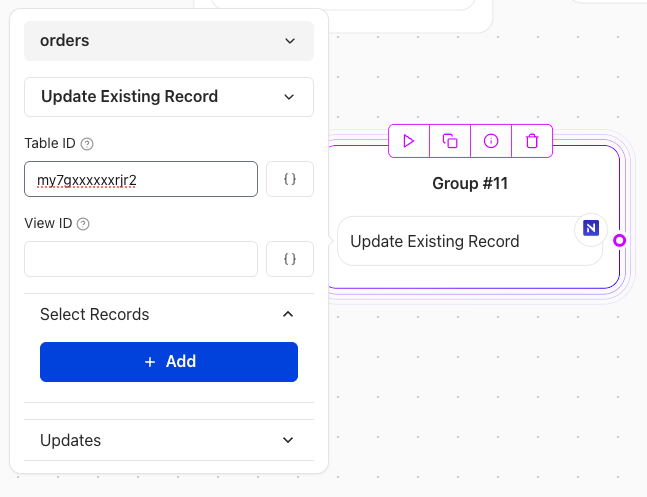
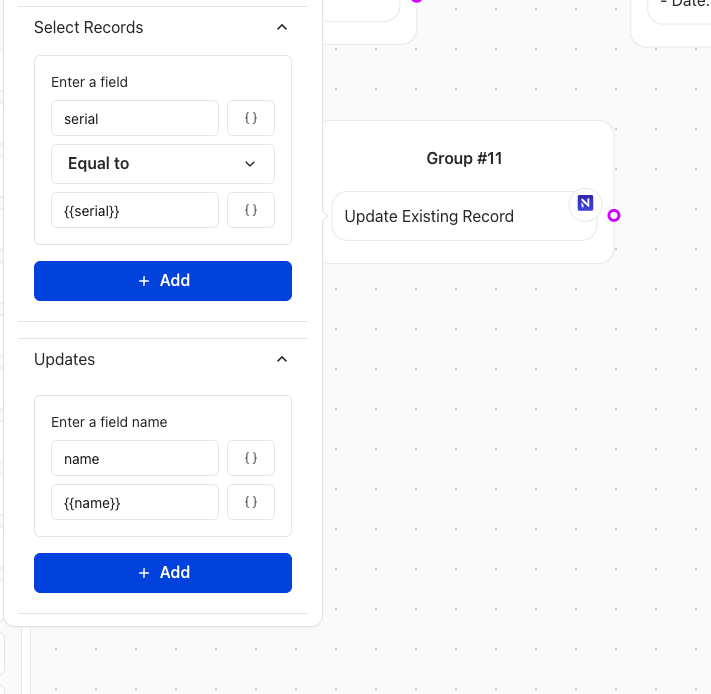
Next scenario is to change the order Name. We can do this by creating a new **Text element** to ask for the Serial Number and change the order name. For this scenario we add a new NocoDB element and select the Update Existing Record action. We will use the **Serial Number** from the table configuration and the **Response Mapping** to map the variables we created in the previous step to look for the record we want to update.
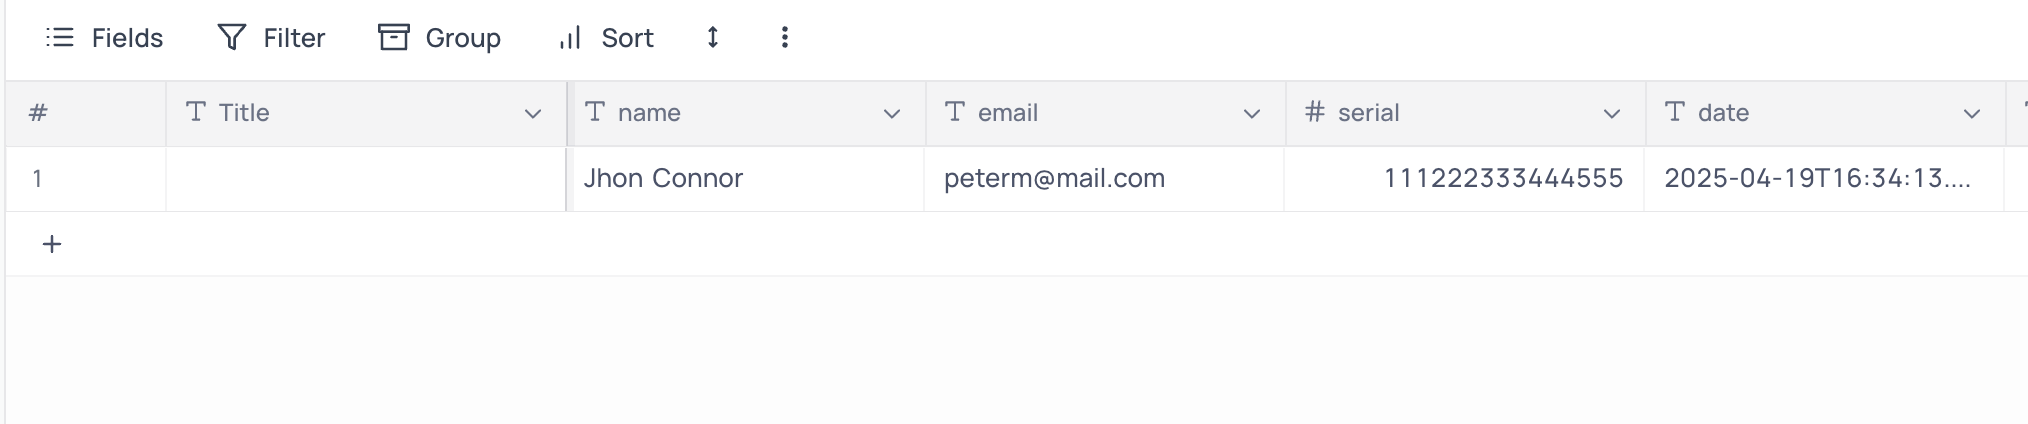
We can check the data before and after the update by running the agent and entering the data.
Before the update:
Update order by running the agent and entering the data.
After the update:
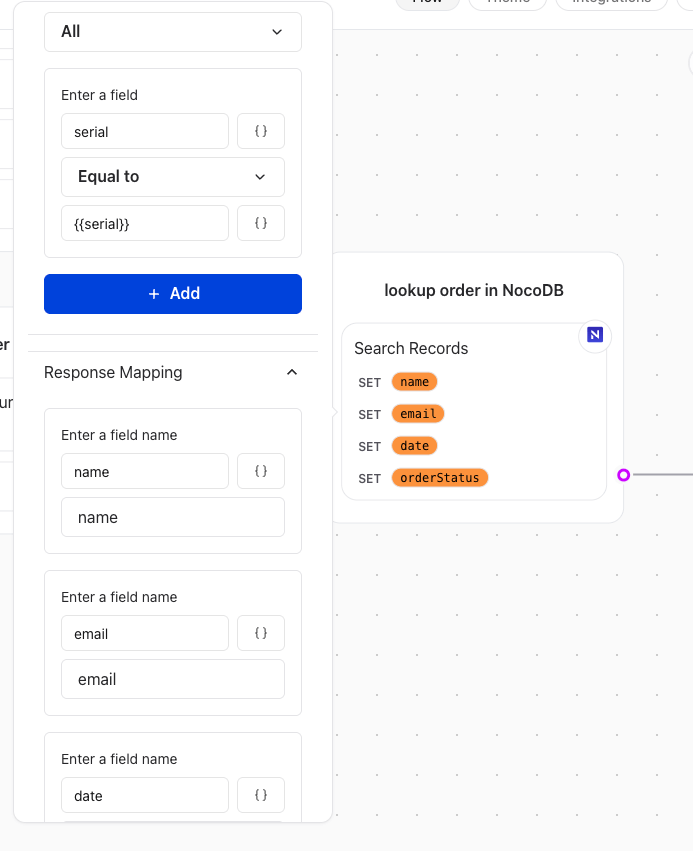
Now we can test the last scenario by **searching a record** by the **Serial Number**.
We can do this by creating a new **Text element** to ask for the Serial Number and display the order.
For this scenario we add a new NocoDB element and select the **I want to search for my request status**. We will use the **Serial Number** from the table configuration.
In the NocoDB configuration element we will enter the search field as the serial field from our NodoDB table and map it to the serial variable we have taken from the input field.
Next we will fill in the **Response Mapping** to map the variables we created in the previous step to look for the record we want to search for.
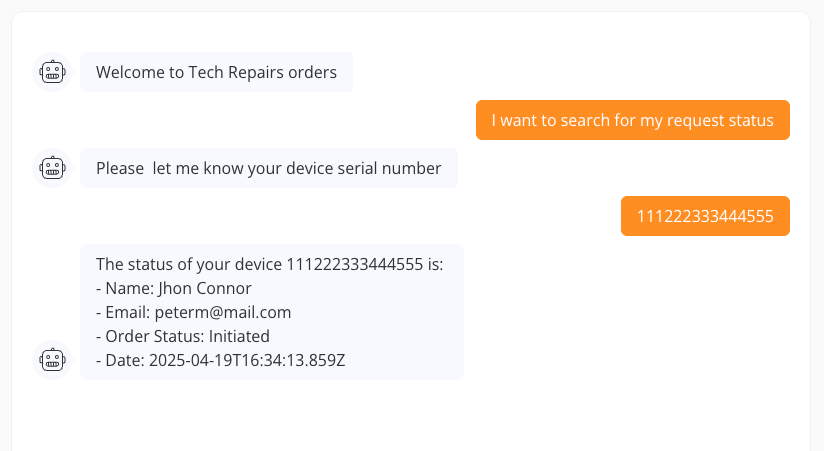
Now we can check the data by running the agent and entering the data of the serial number to search for the order.
## Validation and Testing
Before deploying, ensure:
* The correct **Table ID** and **View ID** are used.
* Filters return the expected results.
* Mapped variables work correctly within the agent's workflow.
 ## Using the Search Records Action
The **Search Records** action in NocoDB allows you to retrieve specific records from your tables. This action requires:
* **Table ID** (mandatory)
* **View ID** (optional, for filtering specific views)
* Additional configuration such as filters and response mapping.
### Steps to Configure
1. In your Agent Dialog editor, select the **NocoDB element**.
2. Choose the **Search Records** action.
3. Input the following fields:
* **Table ID**: Paste the copied Table ID.
* **View ID**: If you want to filter data by a specific view, add its ID here.
* **Filter**: Set conditions to retrieve `All`, `First`, `Last`, or `Random` records.
* **Response Mapping**: Map retrieved data fields to variables for use in your agent.
### Example Setup
#### Input
```json theme={null}
{
"Table ID": "pl0jailghvv7x",
"View ID": "awyy0nk17stiqr",
"Filter": "First",
"Response Mapping": {
"Name": "VariableName",
"Email": "VariableEmail"
}
}
```
#### Workflow Example
In this simple example we are going to create a work order record for a repair company. To keep the example simple we will only ask for the user name, email, and serial number of the device.
The first step is to create a **Text element** to greet the user and ask for their name, email, and serial number.
## Using the Search Records Action
The **Search Records** action in NocoDB allows you to retrieve specific records from your tables. This action requires:
* **Table ID** (mandatory)
* **View ID** (optional, for filtering specific views)
* Additional configuration such as filters and response mapping.
### Steps to Configure
1. In your Agent Dialog editor, select the **NocoDB element**.
2. Choose the **Search Records** action.
3. Input the following fields:
* **Table ID**: Paste the copied Table ID.
* **View ID**: If you want to filter data by a specific view, add its ID here.
* **Filter**: Set conditions to retrieve `All`, `First`, `Last`, or `Random` records.
* **Response Mapping**: Map retrieved data fields to variables for use in your agent.
### Example Setup
#### Input
```json theme={null}
{
"Table ID": "pl0jailghvv7x",
"View ID": "awyy0nk17stiqr",
"Filter": "First",
"Response Mapping": {
"Name": "VariableName",
"Email": "VariableEmail"
}
}
```
#### Workflow Example
In this simple example we are going to create a work order record for a repair company. To keep the example simple we will only ask for the user name, email, and serial number of the device.
The first step is to create a **Text element** to greet the user and ask for their name, email, and serial number.
 We are also creating a **Date** field and a **Order Status** by using variables.
Next we can head to NocoDB site to create a new table. We will create a table called **Orders** with the following fields:
* **Name**: Text
* **Email**: Text
* **Serial**: Text
* **Date**: Text
* **OrderStatus**: Text
We are also creating a **Date** field and a **Order Status** by using variables.
Next we can head to NocoDB site to create a new table. We will create a table called **Orders** with the following fields:
* **Name**: Text
* **Email**: Text
* **Serial**: Text
* **Date**: Text
* **OrderStatus**: Text
 Next we can connect the NocoDB element to the **Create Record** action. We will use the **Table ID** from the table configuration and the **Response Mapping** to map the variables we created in the previous step.
 Now we can map the variables we created in the previous step to the NocoDB fields. We will map the **Name** variable to the **Name** field, the **Email** variable to the **Email** field, and so on.
 Then we complete the records creation with a confirmation message.
 We can test this scenario by running the agent and entering the data.
 Once we have entered the data we can check the NocoDB table to see if the record was created.
 Next scenario is to change the order Name. We can do this by creating a new **Text element** to ask for the Serial Number and change the order name. For this scenario we add a new NocoDB element and select the Update Existing Record action. We will use the **Serial Number** from the table configuration and the **Response Mapping** to map the variables we created in the previous step to look for the record we want to update.
 We can check the data before and after the update by running the agent and entering the data.
Before the update:
We can check the data before and after the update by running the agent and entering the data.
Before the update:
 Update order by running the agent and entering the data.
 After the update:
 Now we can test the last scenario by **searching a record** by the **Serial Number**.
We can do this by creating a new **Text element** to ask for the Serial Number and display the order.
For this scenario we add a new NocoDB element and select the **I want to search for my request status**. We will use the **Serial Number** from the table configuration.
In the NocoDB configuration element we will enter the search field as the serial field from our NodoDB table and map it to the serial variable we have taken from the input field.
Next we will fill in the **Response Mapping** to map the variables we created in the previous step to look for the record we want to search for.
Now we can test the last scenario by **searching a record** by the **Serial Number**.
We can do this by creating a new **Text element** to ask for the Serial Number and display the order.
For this scenario we add a new NocoDB element and select the **I want to search for my request status**. We will use the **Serial Number** from the table configuration.
In the NocoDB configuration element we will enter the search field as the serial field from our NodoDB table and map it to the serial variable we have taken from the input field.
Next we will fill in the **Response Mapping** to map the variables we created in the previous step to look for the record we want to search for.
 Now we can check the data by running the agent and entering the data of the serial number to search for the order.
 ## Validation and Testing
Before deploying, ensure:
* The correct **Table ID** and **View ID** are used.
* Filters return the expected results.
* Mapped variables work correctly within the agent's workflow.
## Validation and Testing
Before deploying, ensure:
* The correct **Table ID** and **View ID** are used.
* Filters return the expected results.
* Mapped variables work correctly within the agent's workflow.