> ## Documentation Index
> Fetch the complete documentation index at: https://docs.release0.com/llms.txt
> Use this file to discover all available pages before exploring further.
# How to Use Variables in Your Agent
> Understand how to use variables to store and reuse user input for a customized agent experience in Release0. Learn to create, update, and display variables in your chatbot flows, including handling sensitive information securely.
Variables act as **placeholders for content** that can be reused throughout your Agent. Understanding how to utilize variables is essential for creating a truly customized user experience.
## Saving an Answer in a Variable
To store user input in a variable, configure your **[User Input element](/editor/elements/user-inputs/text)** to save the response. This variable can then be reused elsewhere in your Agent Dialog. For example:
```plaintext theme={null}
{{MyVariable}}
```
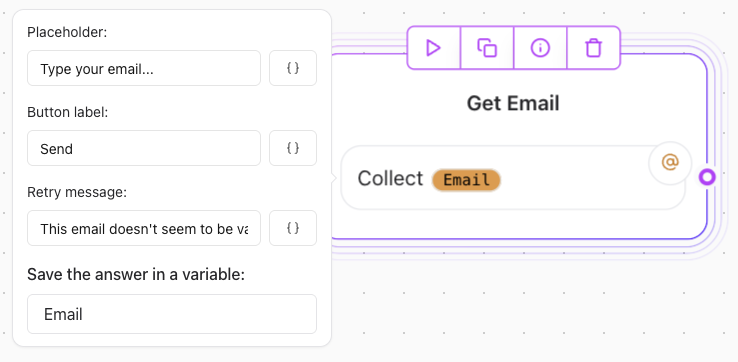
You can also **create**, **use** or **update** variables in most **Release0** elements. For example if you agent requests the user to input his/her email address, you can enter the **[Email element](/editor/elements/user-inputs/email)** and in its configuration, you can type Email in the "Save the answer in a variable". This will create a new variable called Email and save the user's input in it.
 ## Using Variables
Once declared, you can use variables anywhere in your Agent by referencing them with the following syntax:
```plaintext theme={null}
{{My variable}}
```
Here, *“My variable”* is the name of the variable.
### Example:
If a variable named `FirstName` contains "John", you can display it in a dialog like this:
```plaintext theme={null}
Hello, {{FirstName}}!
```
This will render as:
```plaintext theme={null}
Hello, John!
```
### Secured Varfiables
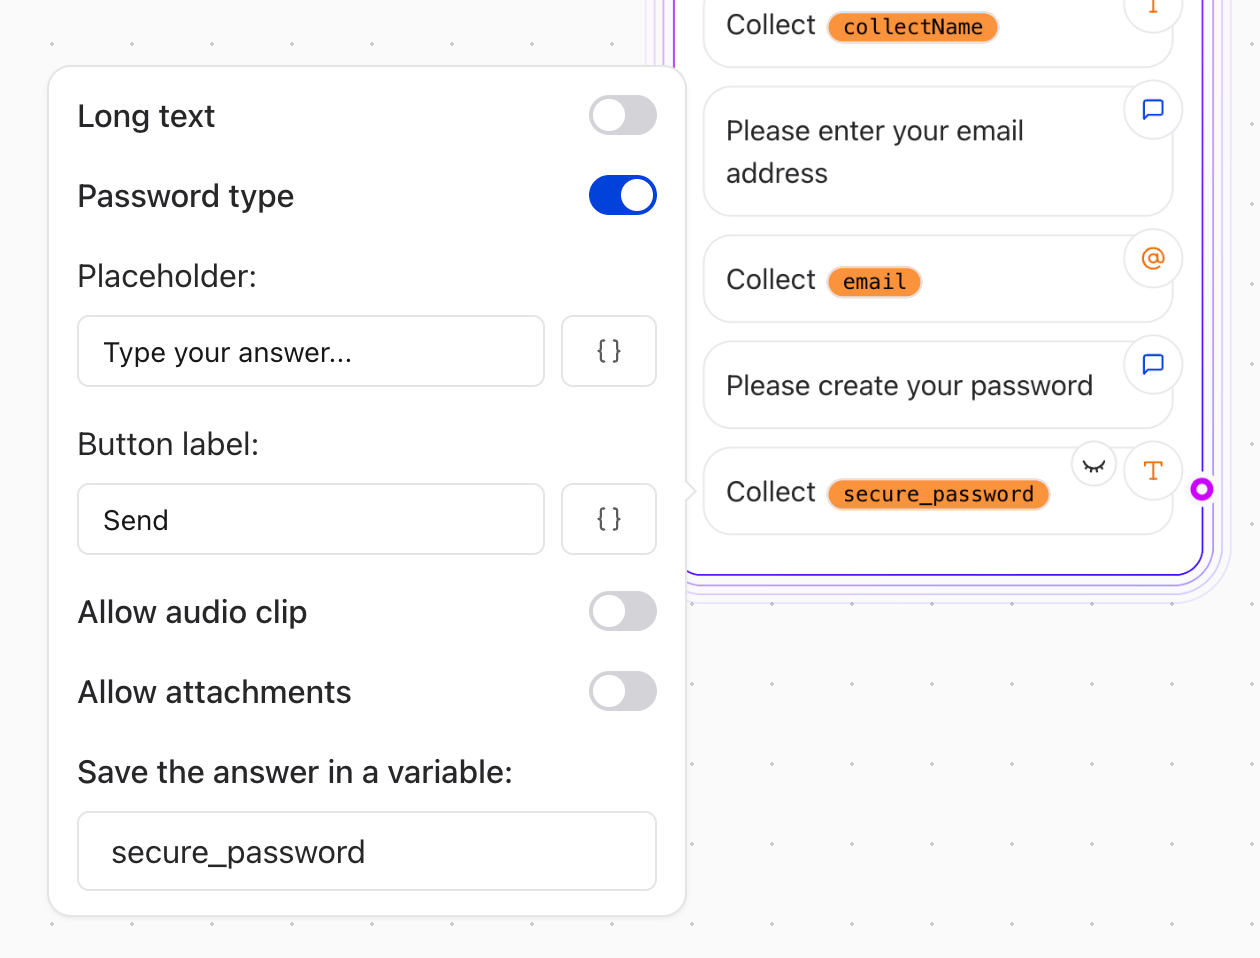
There are cases where you might want to store sensitive information, such as passwords or personal identifiers. To ensure these variables are not stored in the Submission section, prefix the variable name with `secure_`. For example:
```plaintext theme={null}
secure_Password
```
This variable will not be saved in the [Submission table](/submission/overview), but you can still use it in your flow logic.
It can be used incombination with the **[Text input element with Password enabled](/editor/elements/user-inputs/text#password-type-input)** to collect sensitive information securely.
## Using Variables
Once declared, you can use variables anywhere in your Agent by referencing them with the following syntax:
```plaintext theme={null}
{{My variable}}
```
Here, *“My variable”* is the name of the variable.
### Example:
If a variable named `FirstName` contains "John", you can display it in a dialog like this:
```plaintext theme={null}
Hello, {{FirstName}}!
```
This will render as:
```plaintext theme={null}
Hello, John!
```
### Secured Varfiables
There are cases where you might want to store sensitive information, such as passwords or personal identifiers. To ensure these variables are not stored in the Submission section, prefix the variable name with `secure_`. For example:
```plaintext theme={null}
secure_Password
```
This variable will not be saved in the [Submission table](/submission/overview), but you can still use it in your flow logic.
It can be used incombination with the **[Text input element with Password enabled](/editor/elements/user-inputs/text#password-type-input)** to collect sensitive information securely.
 ## Inline Variable Formatting
Variables can also be formatted directly when referenced. Using JavaScript, you can perform transformations inline. For example:
* **Convert to Uppercase**:
```plaintext theme={null}
{{={{My variable}}.toUpperCase()=}}
```
If `My variable` contains "John", the output will be "JOHN".
* **Accessing List Items**:
* First item: `{{={{My variable}}[0]=}}` or `{{={{My variable}}.at(0)=}}`
* Last item: `{{={{My variable}}.at(-1)=}}`
> **Note**: Wrapping the syntax with `{{= ... =}}` evaluates the content as JavaScript.
## Variables Panel
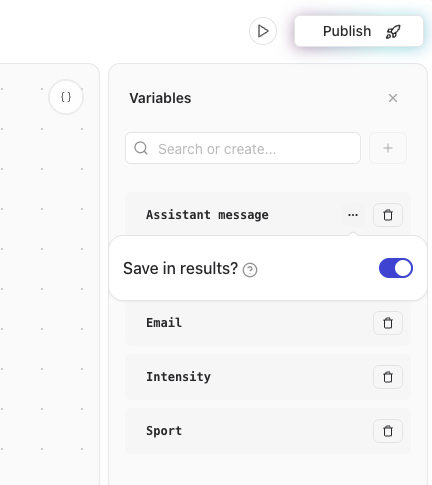
You can manage variables by accessing the **Variables Panel** in the editor (top-right corner). In this panel, you can:
* **Rename**, **edit**, or **delete** variables.
* Enable the option to **save variables in the [Submission table](/submission/overview)** for tracking.
## Inline Variable Formatting
Variables can also be formatted directly when referenced. Using JavaScript, you can perform transformations inline. For example:
* **Convert to Uppercase**:
```plaintext theme={null}
{{={{My variable}}.toUpperCase()=}}
```
If `My variable` contains "John", the output will be "JOHN".
* **Accessing List Items**:
* First item: `{{={{My variable}}[0]=}}` or `{{={{My variable}}.at(0)=}}`
* Last item: `{{={{My variable}}.at(-1)=}}`
> **Note**: Wrapping the syntax with `{{= ... =}}` evaluates the content as JavaScript.
## Variables Panel
You can manage variables by accessing the **Variables Panel** in the editor (top-right corner). In this panel, you can:
* **Rename**, **edit**, or **delete** variables.
* Enable the option to **save variables in the [Submission table](/submission/overview)** for tracking.
 ### Viewing Variables in Results
Variables saved to the results will appear in the **[Submission table](/submission/overview)** under dedicated columns.
## Prefilled Variables
You can prefill variables by passing initial values in the URL when launching your Agent. For example:
### URL Example
Given these variables:
* `Email`
* `First name`
You can initialize them like this:
```plaintext theme={null}
https://release0.com/my-agent?Email=test@test.com&First%20name=John
```
> **Note**: Replace spaces in variable names with `%20` when using URLs.
### Embedding Example
To prefill variables using the embed library:
```javascript theme={null}
Agent.initBubble({
agent: `my-agent`,
initialContext: {
Email: 'test@test.com',
'First name': 'John',
},
});
```
> **Tip**: Surround variable names containing spaces with quotes.
## Hidden Variables
Variables do not need to be visible to the user. Hidden variables can be used internally for tracking session details such as `User ID` or `utm_source`.
To make a variable hidden:
1. Declare it in the **Variables Panel** or dropdown.
2. Exclude it from visible dialogs.
These values will still appear in the **[Submission table](/submission/overview)** for analysis.
## Valid Value Types
Variables can contain:
* **Text** (`string`)
* **List of Texts** (`string[]`)
### Examples:
```javascript theme={null}
// ✅ Valid
'Hello', ['item 1', 'item 2']
// ❌ Invalid
2, true, { foo: 'bar' }
```
> **Warning**: Non-text content (e.g., objects or numbers) will be automatically converted to text.
### Handling Complex Data
To save complex data (e.g., objects), use `JSON.stringify`:
```javascript theme={null}
const data = { foo: 'bar' };
const serialized = JSON.stringify(data);
```
Then, parse it back when using the variable:
```plaintext theme={null}
{{=JSON.parse({{My object variable}})=}}
```
This ensures clean and meaningful variable usage.
***
### Validation and Testing
Before deploying your Agent:
1. Ensure all variables are correctly saved and referenced.
2. Validate inline transformations with JavaScript.
3. Check the **[Submission table](/submission/overview)** for proper tracking.
### Viewing Variables in Results
Variables saved to the results will appear in the **[Submission table](/submission/overview)** under dedicated columns.
## Prefilled Variables
You can prefill variables by passing initial values in the URL when launching your Agent. For example:
### URL Example
Given these variables:
* `Email`
* `First name`
You can initialize them like this:
```plaintext theme={null}
https://release0.com/my-agent?Email=test@test.com&First%20name=John
```
> **Note**: Replace spaces in variable names with `%20` when using URLs.
### Embedding Example
To prefill variables using the embed library:
```javascript theme={null}
Agent.initBubble({
agent: `my-agent`,
initialContext: {
Email: 'test@test.com',
'First name': 'John',
},
});
```
> **Tip**: Surround variable names containing spaces with quotes.
## Hidden Variables
Variables do not need to be visible to the user. Hidden variables can be used internally for tracking session details such as `User ID` or `utm_source`.
To make a variable hidden:
1. Declare it in the **Variables Panel** or dropdown.
2. Exclude it from visible dialogs.
These values will still appear in the **[Submission table](/submission/overview)** for analysis.
## Valid Value Types
Variables can contain:
* **Text** (`string`)
* **List of Texts** (`string[]`)
### Examples:
```javascript theme={null}
// ✅ Valid
'Hello', ['item 1', 'item 2']
// ❌ Invalid
2, true, { foo: 'bar' }
```
> **Warning**: Non-text content (e.g., objects or numbers) will be automatically converted to text.
### Handling Complex Data
To save complex data (e.g., objects), use `JSON.stringify`:
```javascript theme={null}
const data = { foo: 'bar' };
const serialized = JSON.stringify(data);
```
Then, parse it back when using the variable:
```plaintext theme={null}
{{=JSON.parse({{My object variable}})=}}
```
This ensures clean and meaningful variable usage.
***
### Validation and Testing
Before deploying your Agent:
1. Ensure all variables are correctly saved and referenced.
2. Validate inline transformations with JavaScript.
3. Check the **[Submission table](/submission/overview)** for proper tracking.