> ## Documentation Index
> Fetch the complete documentation index at: https://docs.release0.com/llms.txt
> Use this file to discover all available pages before exploring further.
# How to integrate Release0 with React
> Integrate Release0 agents in React applications using optimized components for seamless user experiences. This guide provides usage examples and integration methods for React projects.
## Installation
To install the required package, use the following command:
```bash theme={null}
npm install @release0.com/react
```
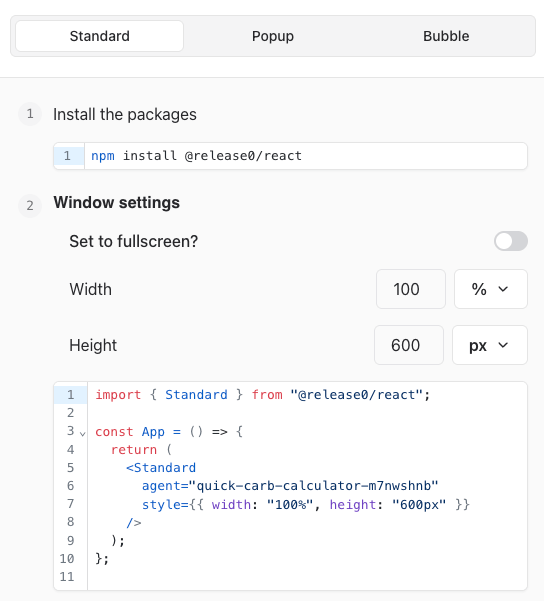
## Standard Integration
The `Standard` component creates a container with a width of 100% (matching the parent width) and a height of 600px.
```javascript theme={null}
import { Standard } from '@release0.com/react';
const App = () => {
return (
);
};
```
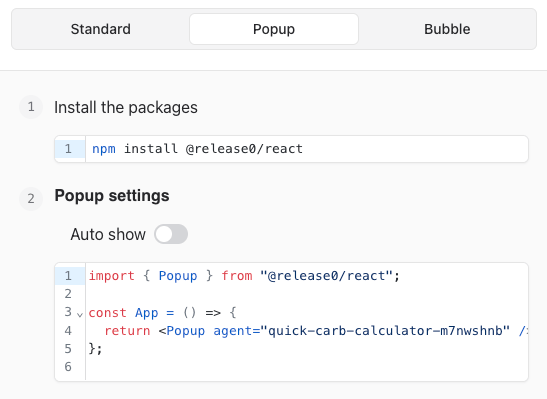
 ## Popup Integration
The `Popup` component automatically triggers a popup window after a specified delay. The example below triggers it after 3 seconds:
```javascript theme={null}
import { Popup } from '@release0.com/react';
const App = () => {
return ;
};
```
## Popup Integration
The `Popup` component automatically triggers a popup window after a specified delay. The example below triggers it after 3 seconds:
```javascript theme={null}
import { Popup } from '@release0.com/react';
const App = () => {
return ;
};
```
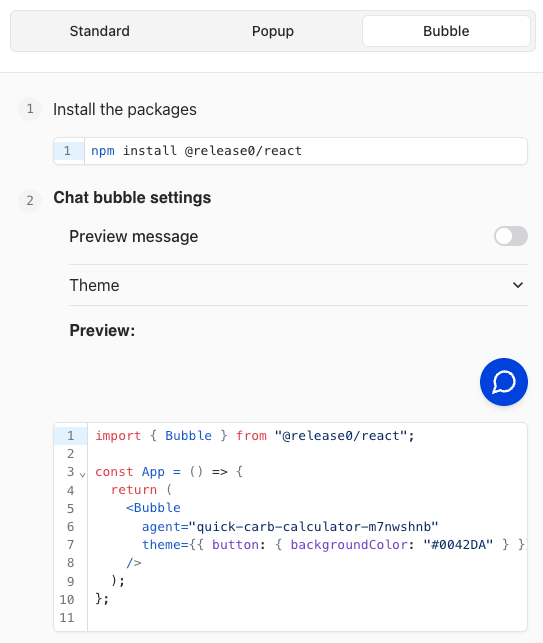
 ## Bubble Integration
The `Bubble` component displays a bubble with a preview message. In this example, the message appears after 5 seconds, and you can customize the theme and avatar:
```javascript theme={null}
import { Bubble } from '@release0.com/react';
const App = () => {
return (
);
};
```
## Bubble Integration
The `Bubble` component displays a bubble with a preview message. In this example, the message appears after 5 seconds, and you can customize the theme and avatar:
```javascript theme={null}
import { Bubble } from '@release0.com/react';
const App = () => {
return (
);
};
```
 ## Additional Configuration
To prefill agent variables in your embed code, use the `initialContext` option. The example below pre-populates values for `Current URL` and `User name`:
```javascript theme={null}
import { Standard } from '@release0.com/react';
const App = () => {
return (
);
};
```
> **Note**: If your site URL contains query parameters (e.g., `https://release0.com?User%20name=John%20Doe`), these variables are automatically injected into the bot. Manual transfer is not necessary.
***
### Validation and Testing
Before deploying, ensure:
1. All components are rendering as expected.
2. Variables are being prefilled correctly.
3. Auto-show delays and custom themes match your requirements.
## Additional Configuration
To prefill agent variables in your embed code, use the `initialContext` option. The example below pre-populates values for `Current URL` and `User name`:
```javascript theme={null}
import { Standard } from '@release0.com/react';
const App = () => {
return (
);
};
```
> **Note**: If your site URL contains query parameters (e.g., `https://release0.com?User%20name=John%20Doe`), these variables are automatically injected into the bot. Manual transfer is not necessary.
***
### Validation and Testing
Before deploying, ensure:
1. All components are rendering as expected.
2. Variables are being prefilled correctly.
3. Auto-show delays and custom themes match your requirements.