How to Find Your Write Key
To locate your Write Key, follow these steps:- Navigate to your Segment dashboard.
- Click on the Sources tab.
- Select the desired source and click the API Keys button to retrieve the key.
Actions Overview
Identify User
Use this action to identify a user in Segment.Required Parameters:
- User ID: A unique identifier for the user.
- Email: The email address of the user.
Optional:
- Traits: A set of user-specific traits (e.g., name, location).
Alias
This action allows you to alias a user in Segment, linking two user identities.Required Parameters:
- Previous ID: The old identifier for the user.
- User ID: The new identifier for the user.
Event
Track an event in Segment using this action.bun installRequired Parameters:
- Event Name: The name of the event (e.g., “Order Completed”).
- User ID: The identifier of the user triggering the event.
Optional:
- Properties: A set of event-specific properties (e.g., order ID, amount).
Page
Send a page view event to Segment using this action.Required Parameters:
- Agent Name: The name of the agent or application initiating the event.
Optional:
- Category: A category name for the page.
- Properties: Additional properties related to the page view.
How to Configure the Segment Block
- Add the Segment Block:
Drag and drop the Segment block into your flow. - Configure the Block:
- Click on the Segment block to open the configuration panel.
- Enter your Write Key in the designated field.
- Select the desired action (Identify, Alias, Event, or Page).
- Fill in the required parameters and any optional ones as needed.
- Test the Block:
- Use the Test button to send a test event to Segment.
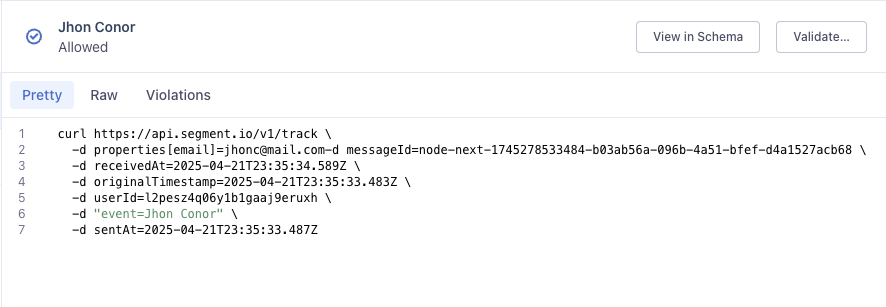
- Check the Segment dashboard to verify the event was received successfully.
- You can use the Segment Debugger to validate the events sent.
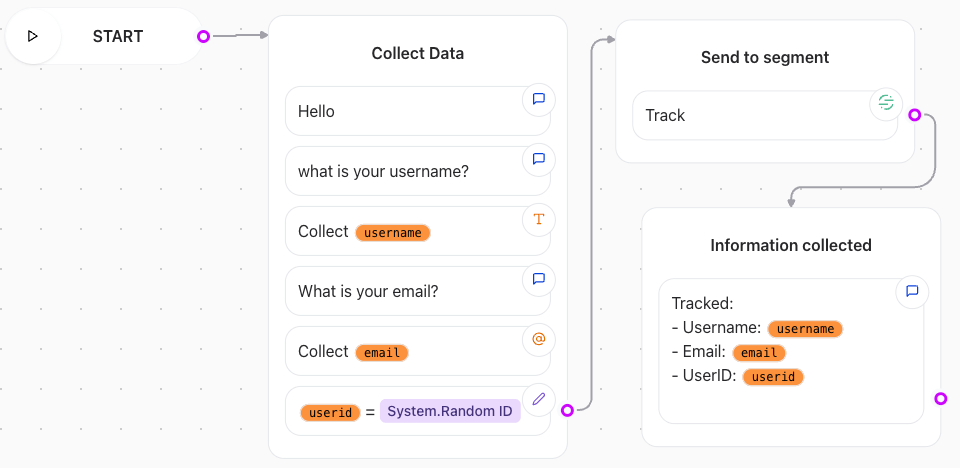
- Create a new block group and collect user data (Name, Username, and Email).
- We can use a random variable to create a random userID.
- Add user input blocks to collect user data.
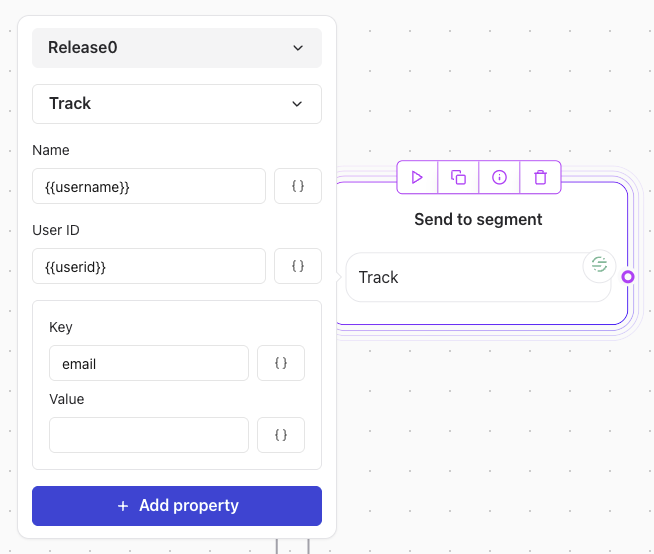
- Add the Segment block and select the Track action.
- Fill in the required parameters:
- User ID: Use the variable that holds the random user ID.
- Email: Use the variable that holds the user’s email address.


Validation and Testing
Before deployment:- Verify your Write Key is correctly configured.
- Test each action with valid parameters to ensure proper functionality.
- Use Segment’s Debugger to validate the events sent.