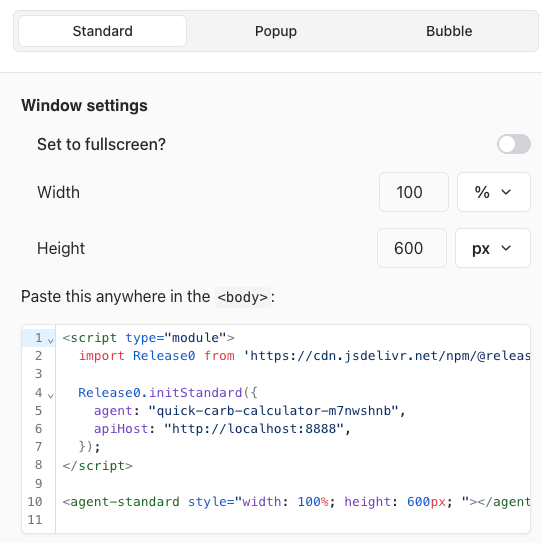
Standard You can get the standard HTML and JavaScript code by clicking on the “HTML & Javascript” button in the “Share” tab of your agent dialog . In this section, you can modify container dimensions.
Below is an example:
< script type = "module" > import Agent from 'https://cdn.jsdelivr.net/npm/@release0.com/js@1.1.9/dist/web.js' Agent . initStandard ({ agent: 'my-agent' , }) </ script > < agent-standard style = "width: 100%; height: 600px; " ></ agent-standard >
This code is creating a container with a 100% width (will match parent width) and 600px height.
See all possible settings
type AgentProps = { id ?: string ; agent : string | any ; isPreview ?: boolean ; resultId ?: string ; initialContext ?: Record < string , unknown >; apiHost ?: string ; font ?: | string | { type : "Google" ; family ?: string | undefined ; } | { type : "Custom" ; url ?: string | undefined ; family ?: string | undefined ; css ?: string | undefined ; }; progressBarRef ?: HTMLDivElement ; startFrom ?: | { type : "group" ; groupId : string ; } | { type : "event" ; eventId : string ; }; sessionId ?: string ; theme ?: { chatWindow ?: { backgroundColor ?: string ; maxWidth ?: string ; maxHeight ?: string ; }; button ?: { size ?: "medium" | "large" | ` ${ number } px` ; backgroundColor ?: string ; iconColor ?: string ; customIconSrc ?: string ; customCloseIconSrc ?: string ; }; previewMessage ?: { backgroundColor ?: string ; textColor ?: string ; closeButtonBackgroundColor ?: string ; closeButtonIconColor ?: string ; }; placement ?: "left" | "right" ; }; previewMessage ?: { avatarUrl ?: string ; message : string ; autoShowDelay ?: number ; }; autoShowDelay ?: number ; onNewInputelement ?: ( inputelement : any ) => void ; onAnswer ?: ( answer : { message : string ; elementId : string }) => void ; onInit ?: () => void ; onEnd ?: () => void ; onNewLogs ?: ( logs : { status : string ; description : string ; details ?: unknown ; }[], ) => void ; onChatStatePersisted ?: ( isEnabled : boolean ) => void ; onScriptExecutionSuccess ?: ( message : string ) => void ; };
Multiple agents To display multiple agents on the same page, assign unique idprops to each:
< script type = "module" > import Agent from 'https://cdn.jsdelivr.net/npm/@release0.com/js@1.1.9/dist/web.js' Agent . initStandard ({ id: 'agent1' agent : 'my-agent' , }) Agent . initStandard ({ id: 'agent2' agent : 'my-agent-2' , }) </ script > < agent-standard id = "agent1" style = "width: 100%; height: 600px; " ></ agent-standard > ... < agent-standard id = "agent2" style = "width: 100%; height: 600px; " ></ agent-standard >
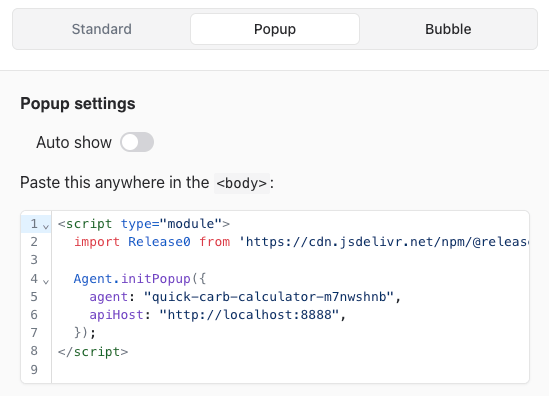
Get the popup HTML and JavaScript code by clicking on the “HTML & Javascript” button in the “Share” tab of your agent dialog.
This will trigger the popup window automatically after 3 seconds .
See all possible settings
type PopupProps = { id ?: string ; agent : string | any ; isPreview ?: boolean ; resultId ?: string ; initialContext ?: Record < string , unknown >; apiHost ?: string ; font ?: | string | { type : "Google" ; family ?: string | undefined ; } | { type : "Custom" ; url ?: string | undefined ; family ?: string | undefined ; css ?: string | undefined ; }; progressBarRef ?: HTMLDivElement ; startFrom ?: | { type : "group" ; groupId : string ; } | { type : "event" ; eventId : string ; }; sessionId ?: string ; theme ?: { chatWindow ?: { backgroundColor ?: string ; maxWidth ?: string ; maxHeight ?: string ; }; button ?: { size ?: "medium" | "large" | ` ${ number } px` ; backgroundColor ?: string ; iconColor ?: string ; customIconSrc ?: string ; customCloseIconSrc ?: string ; }; previewMessage ?: { backgroundColor ?: string ; textColor ?: string ; closeButtonBackgroundColor ?: string ; closeButtonIconColor ?: string ; }; placement ?: "left" | "right" ; }; previewMessage ?: { avatarUrl ?: string ; message : string ; autoShowDelay ?: number ; }; autoShowDelay ?: number ; onNewInputelement ?: ( inputelement : any ) => void ; onAnswer ?: ( answer : { message : string ; elementId : string }) => void ; onInit ?: () => void ; onEnd ?: () => void ; onNewLogs ?: ( logs : { status : string ; description : string ; details ?: unknown ; }[], ) => void ; onChatStatePersisted ?: ( isEnabled : boolean ) => void ; onScriptExecutionSuccess ?: ( message : string ) => void ; autoShowDelay ?: number ; theme ?: { width ?: string ; backgroundColor ?: string ; zIndex ?: number ; }; defaultOpen ?: boolean ; isOpen ?: boolean ; onOpen ?: () => void ; onClose ?: () => void ; };
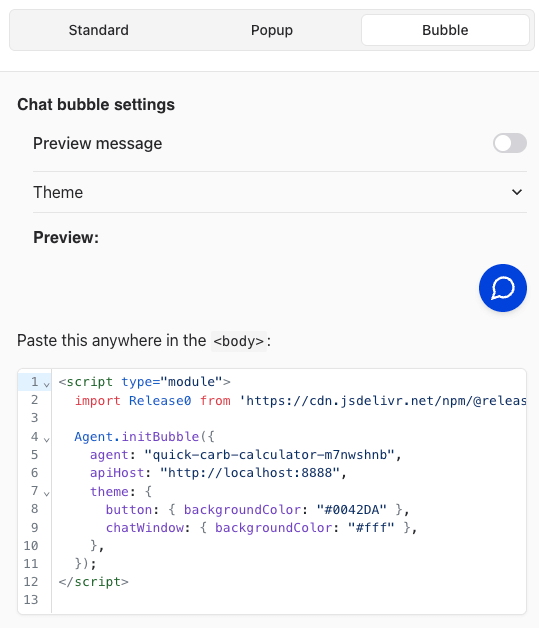
Bubble Click the “HTML & Javascript” button in the “Share” tab of your agent dialog to integrate the bubble.
Here is an example:
< script type = "module" > import Agent from 'https://cdn.jsdelivr.net/npm/@release0.com/js@1.1.9/dist/web.js' Agent . initBubble ({ agent: 'my-agent' , previewMessage: { message: 'I have a question for you!' , autoShowDelay: 5000 , avatarUrl: 'https://release0.com/images/logo512.png' , }, // Defaults to undefined theme: { button: { backgroundColor: '#0042DA' , iconColor: '#FFFFFF' }, previewMessage: { backgroundColor: '#ffffff' , textColor: 'black' }, chatWindow: { backgroundColor: '#ffffff' , maxWidth: '100%' }, }, }) </ script >
This will display a bubble with a preview message after 5 seconds .
See all possible settings
type BubbleProps = { id ?: string ; agent : string | any ; isPreview ?: boolean ; resultId ?: string ; initialContext ?: Record < string , unknown >; apiHost ?: string ; font ?: | string | { type : "Google" ; family ?: string | undefined ; } | { type : "Custom" ; url ?: string | undefined ; family ?: string | undefined ; css ?: string | undefined ; }; progressBarRef ?: HTMLDivElement ; startFrom ?: | { type : "group" ; groupId : string ; } | { type : "event" ; eventId : string ; }; sessionId ?: string ; theme ?: { chatWindow ?: { backgroundColor ?: string ; maxWidth ?: string ; maxHeight ?: string ; }; button ?: { size ?: "medium" | "large" | ` ${ number } px` ; backgroundColor ?: string ; iconColor ?: string ; customIconSrc ?: string ; customCloseIconSrc ?: string ; }; previewMessage ?: { backgroundColor ?: string ; textColor ?: string ; closeButtonBackgroundColor ?: string ; closeButtonIconColor ?: string ; }; placement ?: "left" | "right" ; }; previewMessage ?: { avatarUrl ?: string ; message : string ; autoShowDelay ?: number ; }; autoShowDelay ?: number ; onNewInputelement ?: ( inputelement : any ) => void ; onAnswer ?: ( answer : { message : string ; elementId : string }) => void ; onInit ?: () => void ; onEnd ?: () => void ; onNewLogs ?: ( logs : { status : string ; description : string ; details ?: unknown ; }[], ) => void ; onChatStatePersisted ?: ( isEnabled : boolean ) => void ; onScriptExecutionSuccess ?: ( message : string ) => void ; onOpen ?: () => void ; onClose ?: () => void ; onPreviewMessageClick ?: () => void ; onPreviewMessageDismissed ?: () => void ; };
You can adjust the position of the button with custom CSS. For example:
agent-bubble ::part( button ) { bottom : 60 px ; } agent-bubble ::part(agent) { bottom : 140 px ; height : calc ( 100 % - 140 px ) }
If you have a preview message, you’ll also have to manually position it:
agent-bubble ::part( preview-message ) { bottom : 140 px ; }
Commands Here are the commands you can use to trigger your embedded agent:
Agent.open(): Open popup or bubble
Agent.close(): Close popup or bubble
Agent.toggle(): Toggle the bubble or popup open/close state,
Agent.showPreviewMessage(): Show preview message from the bubble,
Agent.hidePreviewMessage(): Hide preview message from the bubble,
Agent.setPrefilledVariables(...): Set prefilled variables.
Example:Agent . setPrefilledVariables ({ Name: 'Jhon' , Email: 'john@gmail.com' , })
For more information, check out Additional configuration .
Agent.setInputValue(...): Set the value in the currently displayed input.
You can bind these commands on a button element, for example:
< button onclick = " Agent . open ()" > Contact us </ button >
For each command you can pass an optional id prop to target a specific agent. I.e. Agent.open({ id: 'my-bubble' })
Callbacks If you need to trigger events on your parent website when the user interact with the agent, you can use the following callbacks:
Agent . initStandard ({ agent: 'my-agent' , onNewInputelement : ( ) => { console . log ( 'New input element displayed' , inputelement . id ) }, onAnswer : ( answer ) => { console . log ( 'Answer received' , answer . message , answer . elementId ) }, onInit : () => { console . log ( 'Agent initialized' ) }, onEnd : () => { console . log ( 'Agent ended' ) }, })
Additional configuration You can prefill the agent variable values in your embed code by adding the initialContext option. Here is an example:
Agent . initStandard ({ agent: 'my-agent' , initialContext: { 'Current URL' : 'https://release0.com' , 'User name' : 'John Doe' , }, })
It will prefill the Current URL variable with “https://release0.com ” and the User name variable with “John Doe”. More info about variables: here .
Note that if your site URL contains query params (i.e. https://r0.ar/myagent?User%20name=John%20Doe ), the variables will automatically be injected to the agent. So you don’t need to manually transfer query params to the agent embed configuration.